June 23, 2022
March 25, 2022
How to convert a PDF to a Word document free (online)
Convert a PDF to a Word Document Using an Online Conversion Tool
For security purposes, we recommend locally converting your PDF to a Word document. Whenever you upload your document to a remote server, there’s always a chance that the contents might be leaked. However, if your document doesn’t contain sensitive data, another reliable way to turn your PDF into a Word document is by using an online converter. These programs all work the same—all you have to do is upload your PDF and the converter will change it to a Word document.
There’s no shortage of online PDF converters, either. Bigpdfconverter, smallpdf, pdftodoc, and pdftoword
are some of the more popular ones out there. All of them have
successfully completed the task without any issue in my personal
experience. Even better, all of them are free to use. Read through each
one’s policy on how they handle your document to decide which is best
for you.
Source: https://www.pcworld.com/article/622815/how-to-convert-a-pdf-to-a-word-document.html

February 10, 2022
3 Quick Ways to Turn a Chrome Tab Into a Notepad
The next time you're browsing the Web and come across an idea that you need to store for later, make sure you don't forget by using a Chrome tab itself as a notepad.

There are times when you need to write down your thoughts before they are gone. Perhaps you're having a brilliant idea, or you have just remembered something you forgot to do. Luckily, some Chrome extensions are perfect for when you need to take notes on the go.
Curious to find out more? Here are three tools for taking notes in Chrome while using your computer or smartphone. Let's dive in!
1. Papier

One way to turn Chrome into a notepad is to install Papier, a free browser extension. After you install it, open a tab and write whatever crosses your mind.
Papier is clean and distraction-free, making it easy to take notes in Chrome. It allows you to use keyboard shortcuts for emphasizing, underlining, italicizing, and striking through text. There's a night mode to keep things easy on your eyes, too. And you get to add emojis!
On top of that, you won't have to worry about saving your notes. Everything you write in a tab is automatically saved. So, you can close the tab and open it later to check your notes or resume your work.
2. Litewrite.net

A similar option is Litewrite, an open-source application. Simply type litewrite.net into the address bar to turn Chrome into a notepad. The app works offline too, so can you use it even when you don't have an Internet connection.
Connect this Chrome notepad app to your Dropbox, Google Drive, or remote Storage account to sync your data across devices. You may also download and use Litewrite as a Chrome extension, so you can access your notes more easily.
Its interface is clean and easy to use, and your notes are automatically saved. Plus, you can always add new notes by clicking the + icon on the left side of the screen.
RELATED:Quick Ways To Use Your Browser As A Notepad
3. Use This Code Snippet

Another simple way to use Chrome as a notepad is to copy and paste this code snippet into the address bar:
data:text/html, <html contenteditable>
Hit Enter so you can turn the tab into a notepad. However, beware you'll lose anything you have typed when you close the tab.
Remember to transfer the text snippets you create in a tab to your regular text editor and save them at the end of your browsing session.
Related: How to Use Good Note-Taking Strategies to Take Faster Notes
Take Notes on the Go
These free tools can turn Chrome into a notepad easily. They may come in handy when you want to type a short email, write down a piece of code, or copy a link you want to visit later without losing it to the jaws of your Bookmarks folder.
While there are more advanced tools available on the market, the ones listed above will work just fine for basic note-taking. They are free and have a minimalist interface that makes it easy to avoid distractions and focus on your work.
Source: https://www.makeuseof.com/tag/3-quick-ways-to-turn-a-chrome-tab-into-a-notepad/
Two Honorable Mentions:
Memonotepad
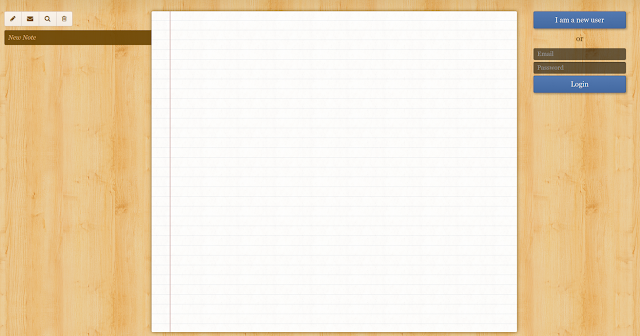
Memonotepad is a website that offers lined notepad screen. You can register your own pages here.
You can go to: https://memonotepad.com/
Notepad Chrome Extension:

You can get the Notepad Chrome Extension here:
https://chrome.google.com/webstore/detail/notepad/ffbhefmlcoihbjcmibbfkocmnaiacinp
There are times when you need to write down your thoughts before they are gone. Perhaps you're having a brilliant idea, or you have just remembered something you forgot to do. Luckily, some Chrome extensions are perfect for when you need to take notes on the go.
Curious to find out more? Here are three tools for taking notes in Chrome while using your computer or smartphone. Let's dive in!
1. Papier
One way to turn Chrome into a notepad is to install Papier, a free browser extension. After you install it, open a tab and write whatever crosses your mind.
Papier is clean and distraction-free, making it easy to take notes in Chrome. It allows you to use keyboard shortcuts for emphasizing, underlining, italicizing, and striking through text. There's a night mode to keep things easy on your eyes, too. And you get to add emojis!
On top of that, you won't have to worry about saving your notes. Everything you write in a tab is automatically saved. So, you can close the tab and open it later to check your notes or resume your work.
2. Litewrite.net
A similar option is Litewrite, an open-source application. Simply type litewrite.net into the address bar to turn Chrome into a notepad. The app works offline too, so can you use it even when you don't have an Internet connection.
Connect this Chrome notepad app to your Dropbox, Google Drive, or remote Storage account to sync your data across devices. You may also download and use Litewrite as a Chrome extension, so you can access your notes more easily.
Its interface is clean and easy to use, and your notes are automatically saved. Plus, you can always add new notes by clicking the + icon on the left side of the screen.
RELATED:Quick Ways To Use Your Browser As A Notepad
3. Use This Code Snippet
data:text/html, <html contenteditable>
Another simple way to use Chrome as a notepad is to copy and paste this code snippet into the address bar:
data:text/html, <html contenteditable>
Hit Enter so you can turn the tab into a notepad. However, beware you'll lose anything you have typed when you close the tab.
Remember to transfer the text snippets you create in a tab to your regular text editor and save them at the end of your browsing session.
Related: How to Use Good Note-Taking Strategies to Take Faster Notes
Take Notes on the Go
These free tools can turn Chrome into a notepad easily. They may come in handy when you want to type a short email, write down a piece of code, or copy a link you want to visit later without losing it to the jaws of your Bookmarks folder.
While there are more advanced tools available on the market, the ones listed above will work just fine for basic note-taking. They are free and have a minimalist interface that makes it easy to avoid distractions and focus on your work.
Source: https://www.makeuseof.com/tag/3-quick-ways-to-turn-a-chrome-tab-into-a-notepad/
Two Honorable Mentions:
Memonotepad
Memonotepad is a website that offers lined notepad screen. You can register your own pages here.
You can go to: https://memonotepad.com/
Notepad Chrome Extension:
You can get the Notepad Chrome Extension here:
https://chrome.google.com/webstore/detail/notepad/ffbhefmlcoihbjcmibbfkocmnaiacinp
January 30, 2022
July 23, 2021
AnyBurn DVD burner review-A complete and free solution for disc burning CD-DVD-Blu Ray

Our Verdict
Those looking for an easy-to-use, free, and powerful disc burning application with all the essential tools will find AnyBurn 5.0 is a great choice – particularly for older PCs given its minimal system requirements.
For
- Flexibility and ease of use
- Minimal hardware requirements
- Impressively fast performance
- Decent online tutorials provided
Against
- Does not support drag and drop for files
- Does not copy multisession discs
AnyBurn 5.0 is a robust disc burning app that’s flexible and easy to use, not to mention well-supported (running on Windows XP or better – not that you should still be using that particular version of Windows, as it’s a long way out of support now).
AnyBurn is freeware, and proof of the old adage that good things come in small packages – another plus point here is that the app is light on system resources. It also benefits from an intuitive interface.

Features
AnyBurn 5.0 benefits from a well-designed interface: a simple yet engaging traditional Windows-based UI that does not require the user to have any special tech knowledge. The software installation procedure is easy and hassle-free.
AnyBurn presents all of its features in a separate pane, from which you can select and perform disc burning tasks. You can easily select the burning speed and the target drive. The settings allow you to verify the written data, finalize the disc, and eject it after burning.
You can use the AnyBurn software to burn files to a disc, copy a disc, or erase a rewritable disc, or even to create an image file from other files or discs. You can also easily convert images to ISO or BIN/CUE and view the disc or drive properties. Ripping an audio CD is also available for MP3, FLAC, APE, WAM, and WAV formats.
The ability to create backups to discs – whether CD, DVD or Blu-ray – is also provided.
As we’ve already touched on, one of the best features of this application is that it doesn’t demand much in the way of your PC’s resources, using up little of your CPU’s precious power, and consuming hardly anything in the way of memory either. The system requirements are extremely low, and AnyBurn is capable of running on an old Intel Pentium 166MHz with only 64MB of memory.
The program is generally responsive and tasks are completed swiftly.

Support
The application comes with support for eight languages: English, French, Polish, Chinese, Italian, Japanese, German and Spanish.
These are a series of tutorials in text form on the AnyBurn website describing the application’s standard functions in detail. These include text-based tutorials on burning audio CDs from various file formats, ripping audio CDs to multiple formats, and even creating bootable USB drives for Windows 7/8/10. You can also get information on the AnyBurn command line functions and their use from these tutorials.
For any software-related complaints or queries, users can send a message to support@anyburn.com. There’s also a contact form on the official website, and the AnyBurn team promises to reply via email as soon as possible.
Final verdict
AnyBurn 5.0 is a robust CD/DVD burner which is free and commendably user-friendly. It allows you to perform a host of CD and DVD burning functions, with detailed tutorials provided online. AnyBurn’s developers seem vigilant enough to work on any user grievances and to modify the app and interface as necessary in respect to the feedback they receive.
The best free DVD burner appsSource: https://www.techradar.com/reviews/anyburn
June 14, 2021
65 Chromebook tips for maximum productivity
By JR Raphael,Contributing Editor, Computerworld, 12-18-18
Chromebooks may be all about simplicity, but don't be fooled:
Beneath their intuitive outer layer lies a web of advanced options. And
you don't have to be a power user to embrace it.
Make your way through this massive collection of next-level tips, and you'll be zipping around Chrome OS like a pro in no time.
Getting around Chrome OS
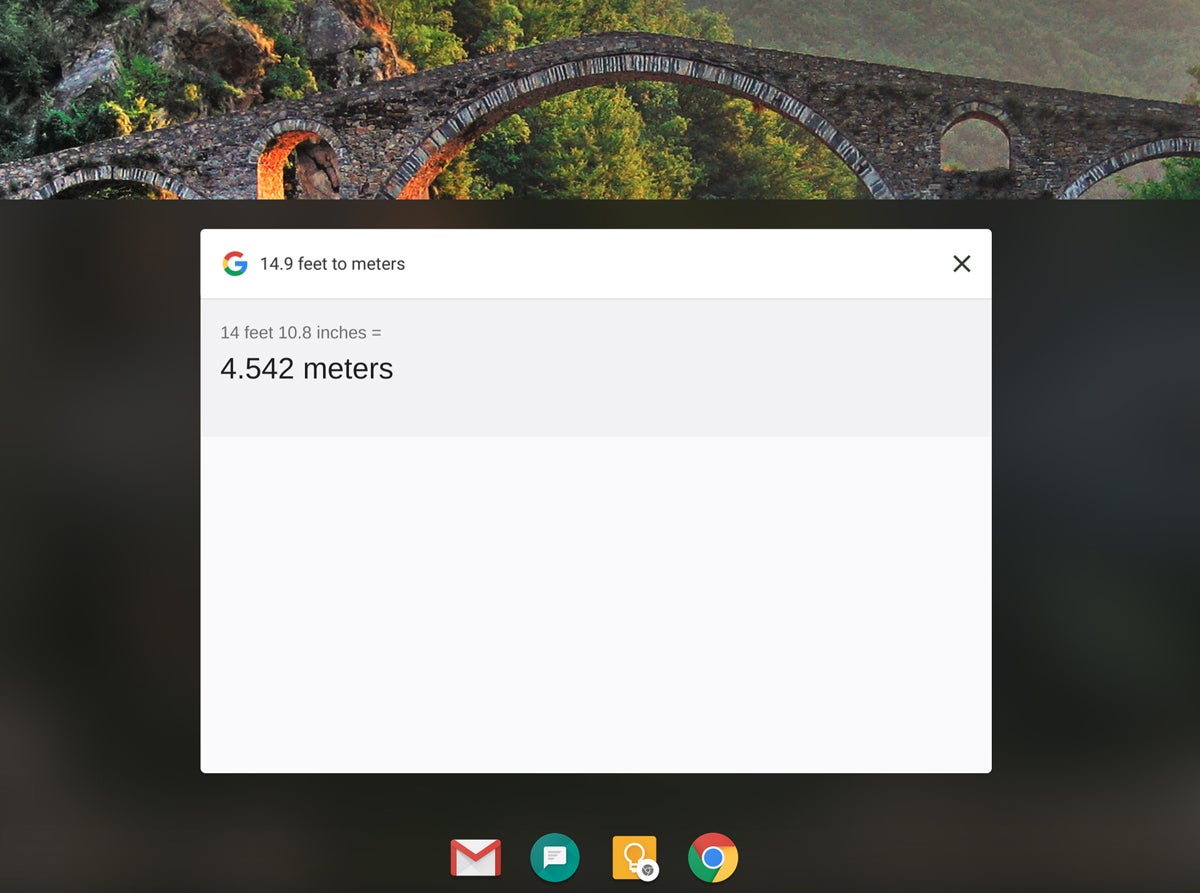
1. The Chrome OS launcher — the drawer-like interface that appears when you tap the Search key or hit the circle icon in the lower-left corner of the screen — is actually a powerful universal search tool. Just start typing as soon as it appears, and you can find and open apps, pull up websites, and even get answers to specific questions right then and there — no clicking or digging required.
2. The launcher has some easily overlooked extra powers, too. Try typing in calculations ("172.4/3"), for instance, or unit conversions ("14.9 feet to meters") to put Google to work at the system level.
 JR Raphael/IDG
The launcher's search box can pull up apps and websites and perform all sorts of other functions. (Click the image to enlarge it.)
3. If you use an Android phone, keep an eye on the very top part of your Chromebook's launcher. Anytime you've had an article open recently in Chrome on your phone, you'll see that page's title appear as the first suggested item directly beneath the launcher's search bar. Click or tap it to open the article and pick up where you left off.
4. Chrome OS has a hidden gesture for accessing the launcher, which is especially useful when you're using a Chromebook as a tablet: Simply swipe up from an open area at the bottom of the screen, and — just like with Android on Google's Pixel phones — the full launcher will appear.
5. You can hide the shelf — the row of pinned "favorites" at the bottom of your screen — by right-clicking it (clicking with two fingers) or long-pressing on it and then selecting the "Autohide shelf" option that appears. That'll cause the shelf to disappear anytime you have an app or window open and then reappear when you mouse over its area or swipe upward from the bottom of the screen. It'll also always show up when you're viewing your desktop.
6. Quickly open any item on your shelf by pressing Alt and then the number key that corresponds with its position: Alt-1 for the first app in the list, Alt-2 for the second, and so on.
7. Right-click or long-press on any app in your shelf or within the main launcher to reveal a series of program-specific shortcuts. You'll find the most options with Android apps, many of which offer one-touch links to functions like composing new messages, starting new documents, or jumping to specific folders or accounts.
8. As of 2018, Chrome OS boasts a distinctly Android-like combined Quick Settings and notification panel in its lower-right corner. You can open it without moving your hands off your keyboard by pressing Shift-Alt-N from anywhere in the system.
9. Just like on Android, it's possible to clear out all of your Chrome OS notifications in one fell swoop — but the command is curiously tough to find. Here's the secret: With your notification panel open, scroll up as far as you can on the area of the screen showing notifications. Once you've moved past the bottommost notification, you'll reveal a "Clear all" button.
 JR Raphael/IDG
Scroll all the way up on a Chromebook's notifications, and you'll see a "Clear all" command to dismiss them all at once. (Click the image to enlarge it.)
10. Got a Chromebook with a stylus? You can take notes right from the lock screen with the Google Keep Android app. Install the app and then look in the "Stylus" section of your device's settings to make sure the option for lock-screen note-taking is enabled. Once it's active, you'll see an icon in the upper-right corner of your lock screen that'll let you scribble away.
Managing apps and windows
11. You might not realize it, but your Chromebook has a handy Overview interface for juggling open apps and windows. You can get to it by pressing the button that looks like a box with two lines on your keyboard (in the function row, directly to the left of the brightness controls) or by pressing the similarly shaped icon that appears in the lower-right corner of the screen when a Chromebook is in its tablet mode.
12. Prefer to get around with your trackpad? Make a mental note of this handy hidden trick: You can swipe downward with three fingers on your trackpad from anywhere in the system to open the Overview interface and see all of your open apps. You can then swipe back upward with three fingers to return to your most recently used process.
13. One more nifty Overview access trick: When your convertible Chromebook is in its tablet mode (with the keyboard either detached or swiveled around the back), swipe down from the top of the screen while any app is open. That'll shrink the app down into the Overview screen, where you can drop it and then select any other active app or window you want to open.
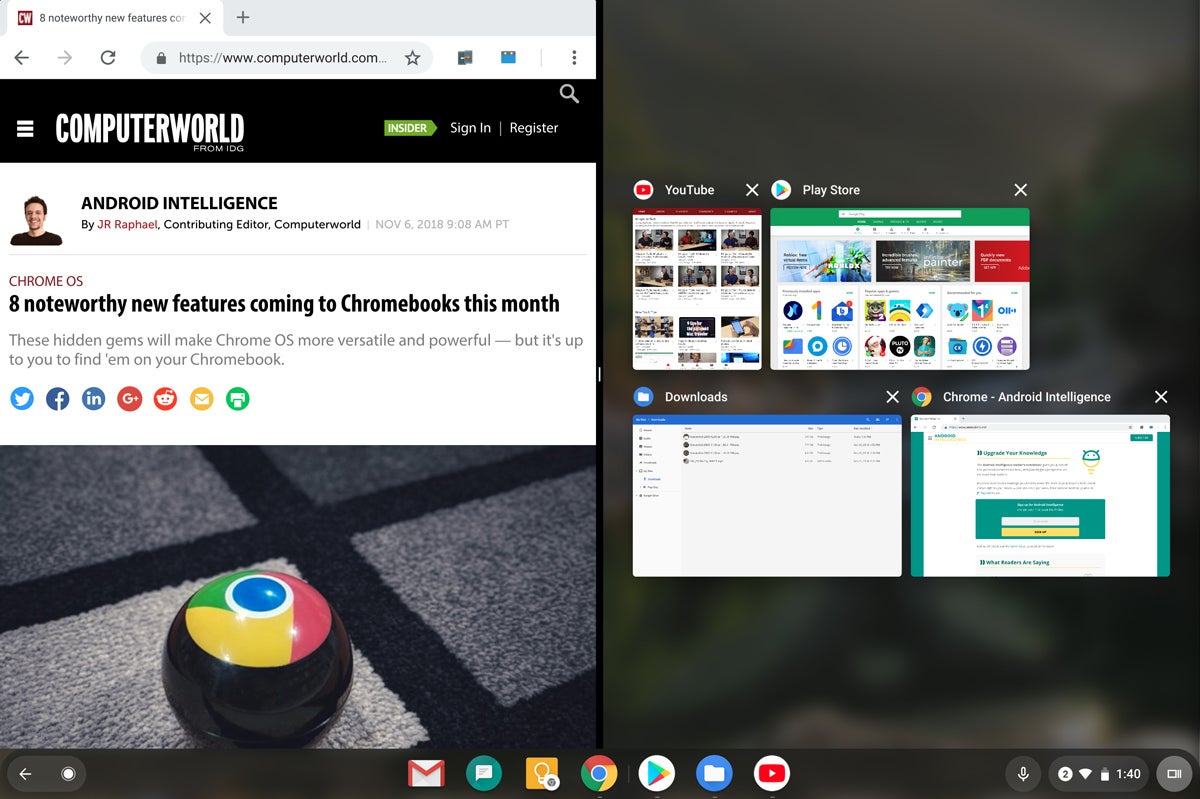
14. You can open two apps side by side in a split-screen mode by following the same step described above but then dragging the app to the left or right side of the screen. When you see that half of the screen light up, let go — then either select another active app from the Overview interface or open a new app from your launcher to fill the other half. You can do this with any combination of websites, Chrome apps, Android apps, and even Linux apps (more on those in a moment).
 JR Raphael/IDG
Chrome OS's split-screen mode can be a helpful way to multitask while using a Chromebook in its tablet mode. (Click the image to enlarge it.)
15. While viewing two apps in a split-screen setup, press and hold the black bar in the center and drag it in either direction to make either side larger or smaller.
16. If you have a lot of apps and windows open, try going into Chrome OS's Overview screen and then typing the name of the process you want. The system will gray out nonmatching items as you type and highlight only those that include whatever letters you've entered.
17. Prefer a faster Alt-Tab-like method of switching between processes? Your Chromebook has that, too — quite literally: Just press Alt-Tab once to toggle back and forth between your two most recently used apps or windows, or press and hold Alt-Tab to pull up a quick switching utility that'll let you tab between all of your actively open items.
18. Want to move backwards in your Alt-Tab list — from right to left instead of left to right? Hold down Shift along with Alt and Tab.
19. Snap any app or window to the side of your screen by hitting either Alt and [ (left bracket) for the left side or Alt and ] (right bracket) for the right side. Repeat the command a second time to return the app or window to its default centered position.
20. Minimize an app or window by pressing Alt and - (the minus key). Press that same key sequence again to bring the app or window back up into its previous position.
21. Maximize an app or window by pressing Alt and = (the equals key). Press that same key sequence again to move the app back into its previous size.
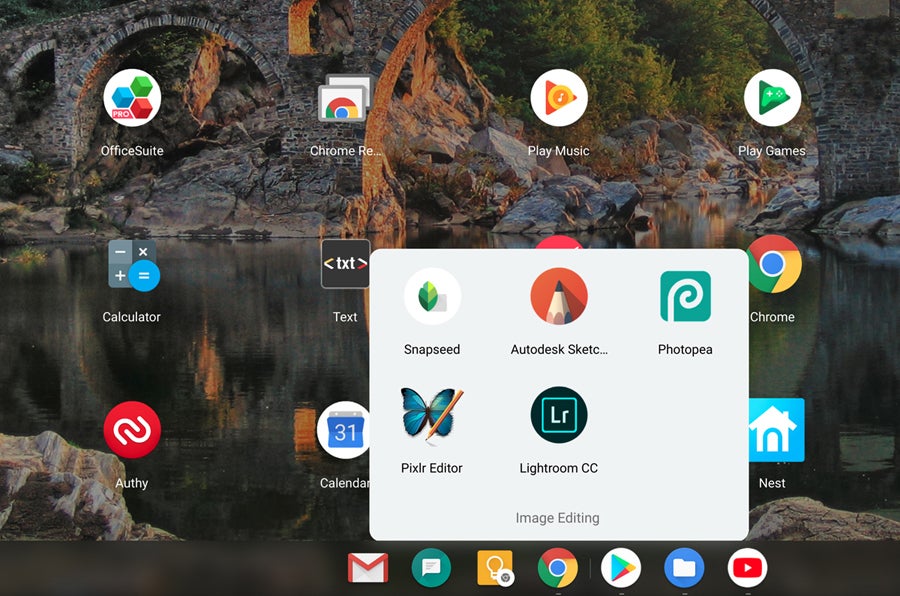
22. Give your Chromebook's apps some extra organization by creating folders within the Chrome OS launcher. All you've gotta do is click or tap on any app and then drag it on top of another app's icon. You can then click or tap to open the folder and give it a name. And if you ever want to take an app out of a folder, just click or tap the app in question and drag it out.
 JR Raphael/IDG
Organize your Chromebook's launcher by grouping similar apps together into folders. (Click the image to enlarge it.)
Getting around the web
23. Within a regular browser window, swipe left on the screen — or on your trackpad, using two fingers — to go back one page in your browsing history. Swipe right to go forward.
24. You can also press Alt and the left or right arrow key to accomplish the same thing.
25. In a window with multiple tabs, swipe left or right on your trackpad with three fingers to move among the tabs.
26. Next time you want to open a link as a new tab, save yourself a step and simply click the link with three fingers on your trackpad. It'll automatically open into a new tab in the background — no right-clicking and menu-selecting required.
27. Close a tab quickly by hovering over its title bar and then clicking your Chromebook's trackpad with three fingers.
28. Pull up the browser's main menu in a jiff by hitting Alt-E while in an active window.
29. Need to open up a new browser window from the Chrome OS desktop — or pretty much anywhere else in the operating system? Just hit Ctrl-N.
30. Add any website you visit regularly into your device's shelf for easy on-demand access by opening Chrome's menu (while viewing the site), selecting "More tools," and then selecting "Create shortcut."
31. If you have a shortcut to a website in your Chromebook's shelf and you want it to look more like a regular app — without the browser-oriented elements — right-click or long-press its icon, hover over the arrow next to "New tab," and select "New window" from the panel that appears.
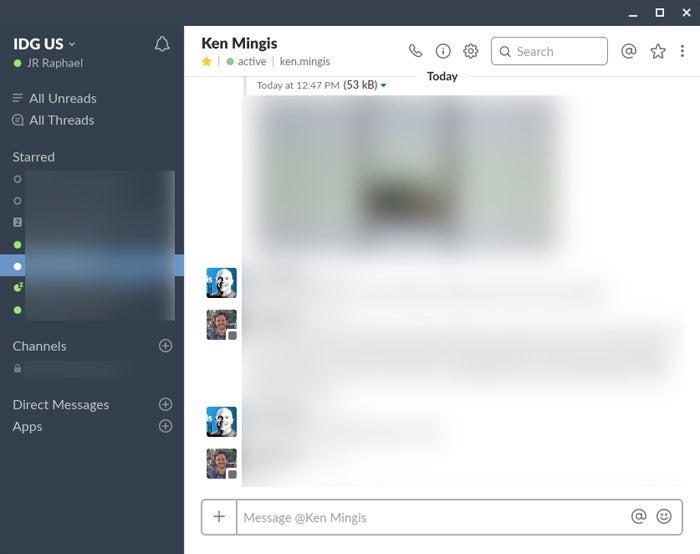
32. If you're really feeling ambitious, you can go a step further and turn any website into an actual native Chrome app — with any icon and color scheme you want — by following the steps outlined on this page.
 JR Raphael/IDG
You can make any website look and act like a native Chrome app, as seen here with Slack.
33. Some websites — such as Sling TV — somehow still don't recognize a Chromebook as a valid type of computer and consequently won't let you sign in and use their services. You can get around this by installing the free User-Agent Switcher for Google Chrome extension. Then, just select a different operating system within the extension's menu, and that's it: The silly website will be tricked into thinking you're on a different type of device — and whaddya know, everything will suddenly work fine.
Improving your text input
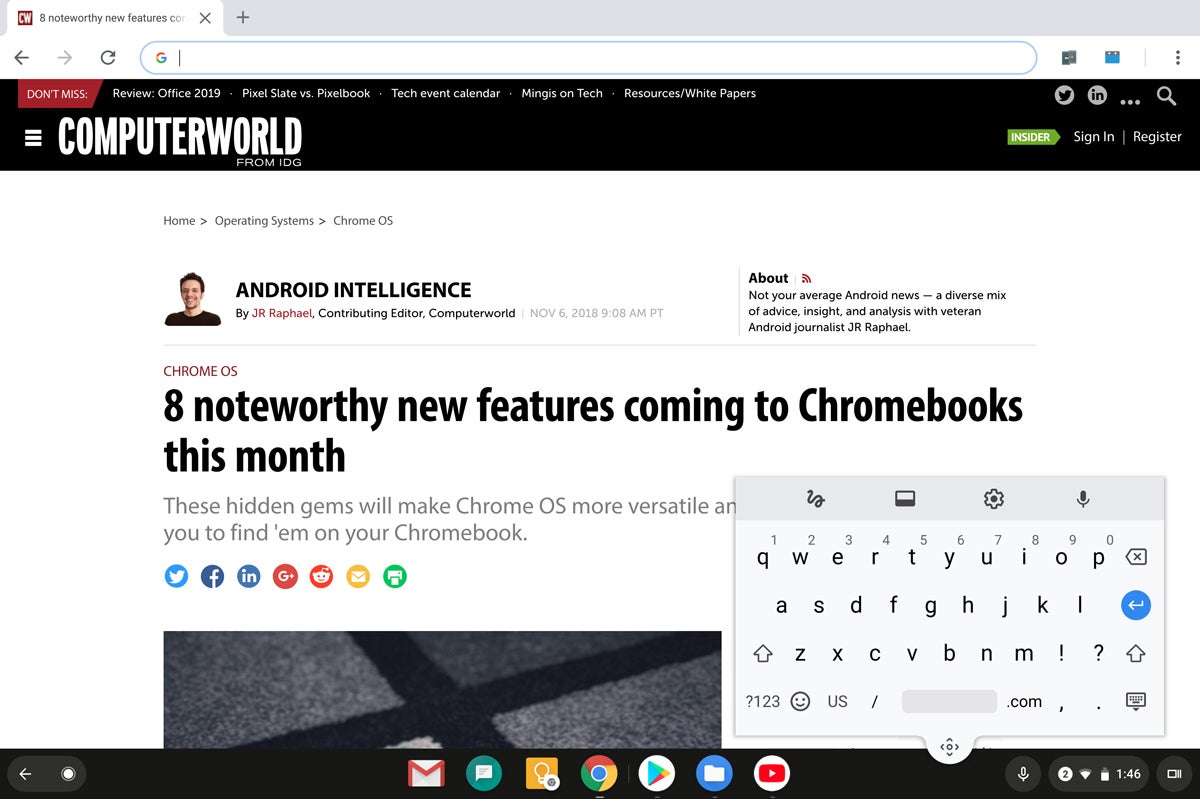
34. Don't make yourself use that oversized on-screen keyboard that comes up by default in a Chromebook's tablet mode. Instead, tap the second icon along the keyboard's top row — the one that looks like a rectangle with a small, dark rectangle inside it. That'll shrink Chrome OS's keyboard down into a far more manageable phone-like keyboard that you can move around (using the "handle" at the keyboard's bottom) and place anywhere you like.
 JR Raphael/IDG
The floating on-screen keyboard is much easier to use than Chrome OS's default full-width version. (Click the image to enlarge it.)
35. If handwriting is more your thing, be it with your finger or a stylus, tap the first icon along the Chrome OS keyboard's top row — the one that looks like a hand-drawn squiggle. That'll give you an open canvas on which you can write anything you want by hand and have it converted into text as you go.
36. Chrome OS's on-screen keyboard has a built-in microphone icon that makes voice-to-text simple for tablet-style usage, but you can actually tap into the same superb dictation system even when using a Chromebook with a physical keyboard: Open up your Chromebook's settings, scroll all the way down to the bottom, and tap "Advanced." Scroll down more until you see the "Accessibility" header, then tap "Manage accessibility features" beneath it. Next, activate the toggle next to "Enable dictation (speak to type)," beneath the "Keyboard and text input" header. That'll put a small microphone icon in the lower-right corner of your screen, next to the notification panel; you can then tap it anytime to start speaking and have your words transcribed wherever your cursor is active.
37. Find yourself missing the Caps Lock key? Press the Search key and Alt together to activate Caps Lock. When you're ready to STOP SHOUTING, press Search and Alt again to switch back to normal text.
38. Alternatively, if you really miss Caps Lock — and don't mind giving up Chrome OS's Search key to have it — you can remap the Search key so that it functions as a Caps Lock key by opening your Chromebook's settings and selecting "Keyboard" (beneath the "Device" header).
39. Give your Chromebook extra typing smarts by installing Text Blaze, an extension that lets you create complex custom macros
for your most commonly used phrases. You could set it up to
automatically fill in your mailing address anytime you type "/add" or
even to fill in a complicated email template whenever you type something
like "*go." The possibilities are practically endless, as is the
potential for saving time.
Managing files
40. Chromebooks are all about the cloud and keeping your data perpetually synced — but by default, any files you download are actually stored in a local device folder. Fix that by opening up your Chromebook's settings, scrolling to the bottom, and selecting "Advanced." Find the line labeled "Location" under the "Downloads" header. Click "Change" and select a folder (or make a new folder specifically for downloads) within your Google Drive storage. Now, anything you download will automatically be saved to Drive and thus be instantly available wherever you sign in.
41. If you really want to get wild, you can crank up your Chromebook's cloud-connecting power even more by having your Windows or Mac computer and Android phone also sync downloads with that same Drive folder — effectively creating a single device-agnostic and internet-based "Downloads" folder. That way, anything you download will always be available on any device you're using. You can find the full instructions, if you dare, in this Android Intelligence column.
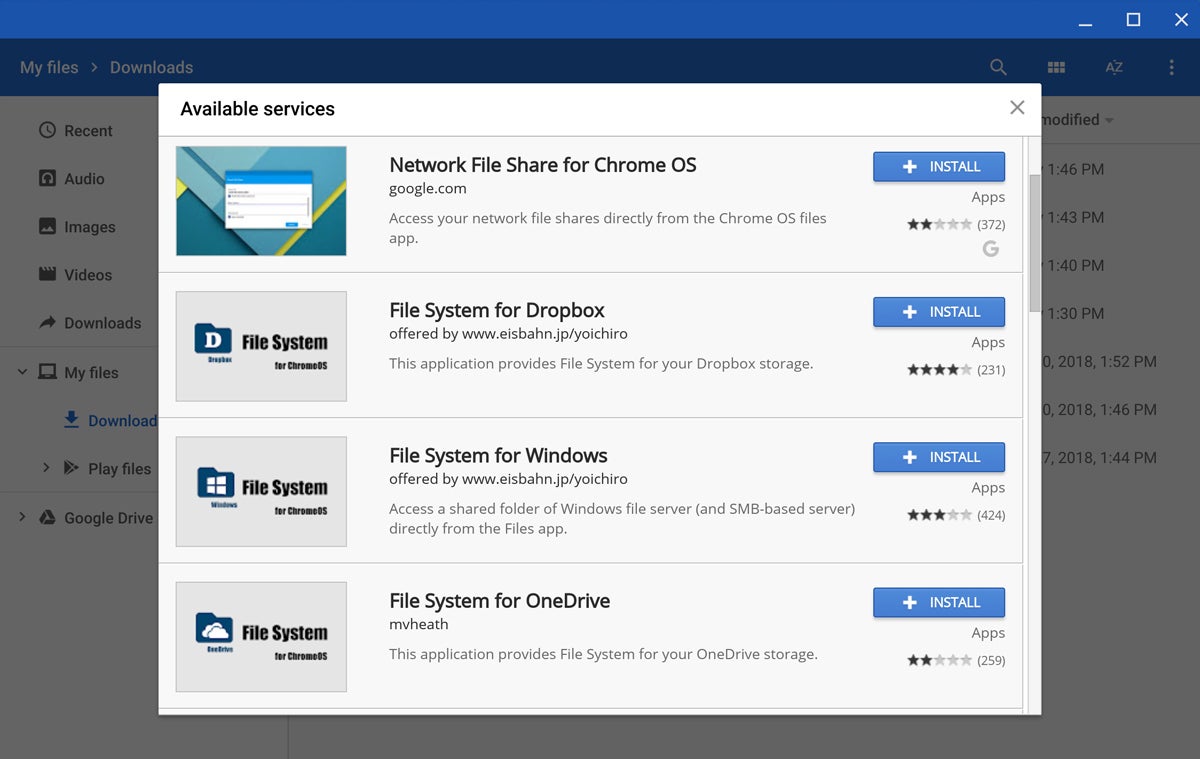
42. Want your Chromebook to integrate with cloud storage beyond just Google Drive? No problem: Open up Chrome OS's Files app, click or tap the three-dot menu icon in its upper-right corner, and select "Add new service" from the menu that appears. You can then select to add a new SMB file share — if you have a network server you want to be able to access — or to install a new service, if you want to integrate Dropbox, OneDrive, or other remote storage services into the Files app for system-wide use.
 JR Raphael/IDG
A few quick clicks are all it takes to integrate Dropbox, OneDrive, and other cloud services directly into Chrome OS's file system. (Click the image to enlarge it.)
43. You can create custom shortcuts to commonly used folders — from either your local storage or any connected cloud service — in the left panel of your Chromebook's Files app for easy ongoing access. Find the folder you want and right-click it, then select "Create shortcut" to add it into the list.
44. Speaking of your Files app, a shortcut to remember: You can quickly open it anytime, from anywhere, by hitting Shift-Alt-M.
45. While in the Files app, you can switch between different sections by hitting Ctrl and then the number keys that correspond with their position (Ctrl-1 for Recent, Ctrl-3 for Images, and so on).
46. Chrome OS's Files app has a built-in photo editor that's perfect for basic image manipulation. While viewing an image in Files, click the pencil-shaped icon in the upper-right corner — or hit "e" on your keyboard — to get started.
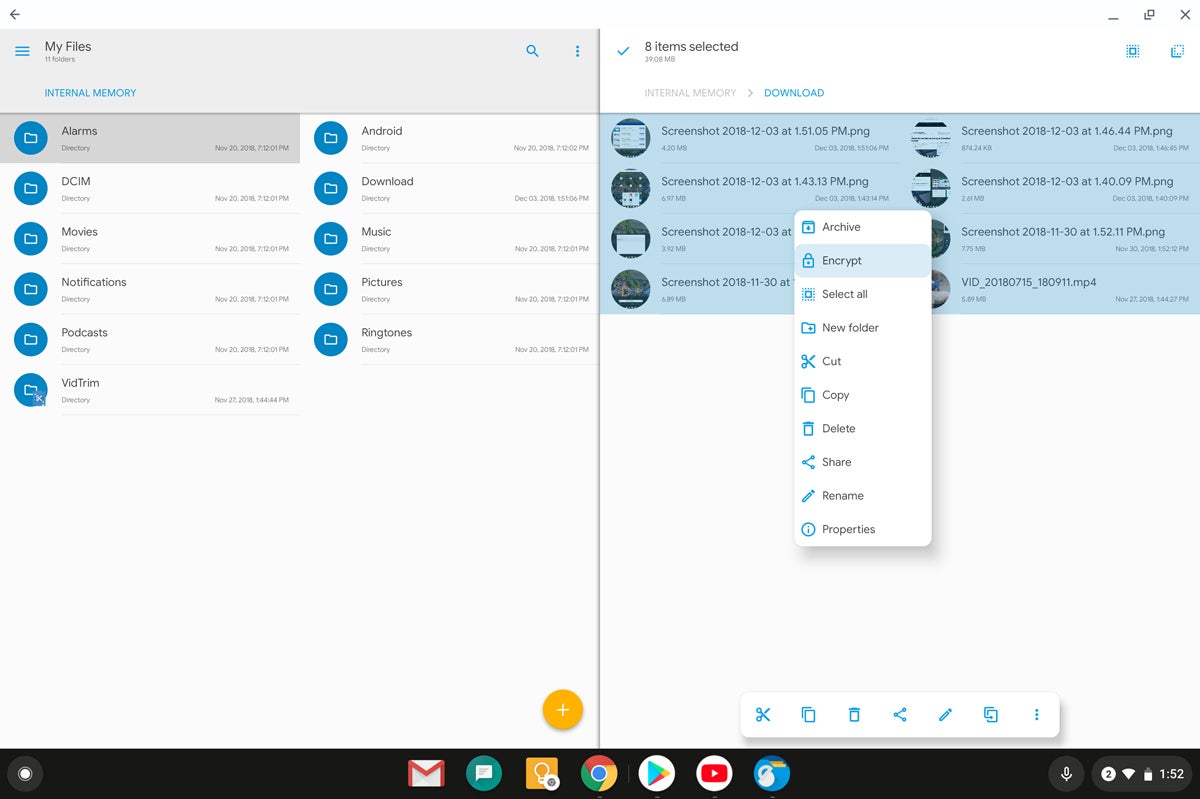
47. For an even more robust file management experience, try installing the Solid Explorer Android app (also my top pick for advanced file management on Android) onto your Chromebook. It's optimized for Chrome OS support and gives you a two-panel view for fast dragging and dropping of files between different locations — including your regular Chrome OS storage, the area of your storage reserved for Android apps, and a huge variety of cloud-based storage accounts you can opt to connect. It also empowers you to add extra encryption onto specific files or folders and even to create password-protected ZIP or 7ZIP archives. The app costs $2 after a two-week trial.
 JR Raphael/IDG
Solid Explorer gives you advanced file management functions like a two-panel view and additional layers of encryption. (Click the image to enlarge it.)
Simplifying security
48. Your Android phone can serve as a virtual key to your Chromebook. All you have to do is set up Smart Lock, which lets you avoid typing in your password whenever your phone is unlocked and nearby. Open the "Connected devices" section of your Chromebook's settings to enable the feature and configure its options.
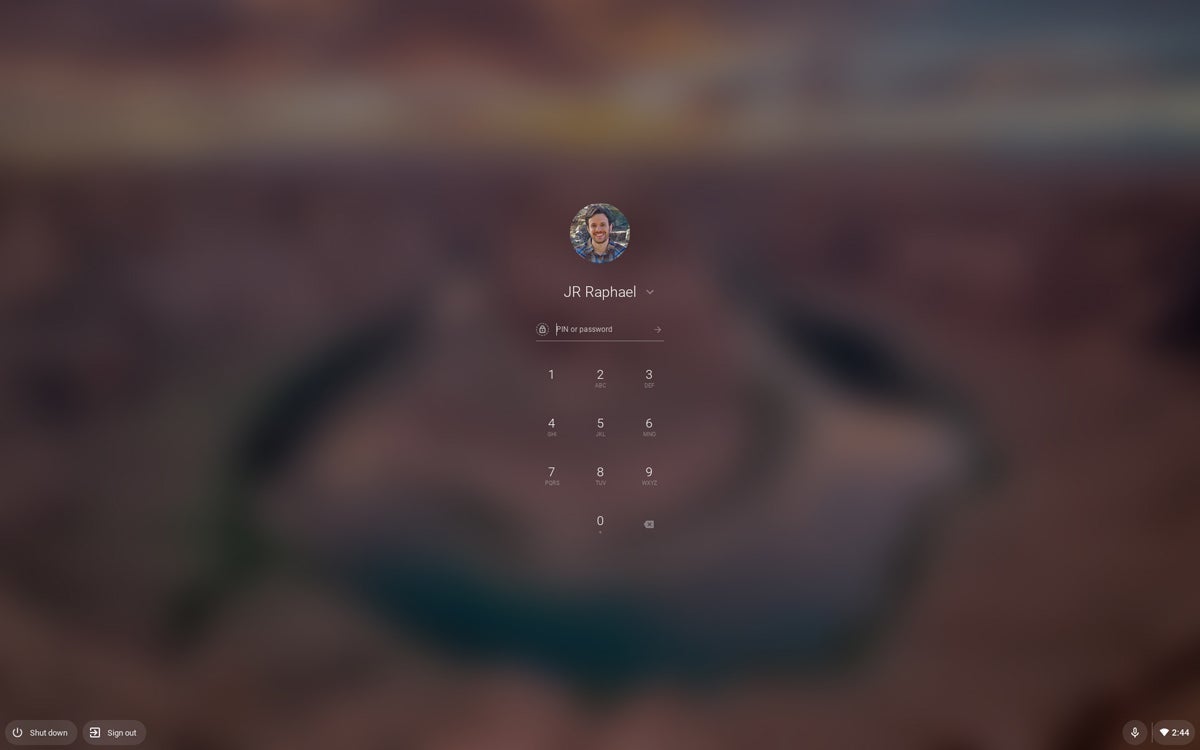
49. If you're using a convertible Chromebook as a tablet, you probably don't want to type in your full password on a giant virtual keyboard every time the system wakes up — especially if you're in a public place with lots of wandering eyes. Luckily, there's a better way: In the "Screen lock and sign-in" section of your device's settings (under the "People" header), you'll find an option to create a PIN that can be tapped in more discreetly on the screen, similar to how you'd unlock a phone.
 JR Raphael/IDG
Setting a PIN makes it more practical to unlock a Chromebook in its tablet mode. (Click the image to enlarge it.)
50. Let someone else use your Chromebook without gaining access to all your info with the help of Chrome OS's Guest Mode. Just look for the "Browse as Guest" option on the lock screen when no one is actively signed in. That'll open up an incognito-like environment where no personal or account-related data is available and nothing that happens is saved beyond that session.
51. By default, Chromebooks make it easy for anyone to add an account and sign in from the lock screen — something you may not want to have happen on your work device. You can turn this feature off by opening the "Manage other people" section in your Chromebook's settings. Activate the toggle next to the line labeled "Restrict sign-in to the following users" and then make sure only your account and any others you want on the device are included in the list.
52. Next time you're stepping away from your Chromebook, secure it quickly by hitting the Search key and then L. That'll take you back to the lock screen and the account sign-in prompt.
53. If you want to go a step further, hitting Ctrl-Shift-Q twice will sign you out of the Chromebook completely — closing any open apps, windows, and so on — no matter where you are in the system or what you're doing.
Embracing system tools
54. Chromebooks have multiple ways to capture screenshots, three of which are particularly useful: To capture the entire screen, either hit Ctrl and the Overview key if your physical keyboard is handy — or press your device's physical power and volume-down buttons if you're using a Chromebook in its tablet mode. To capture a specific limited area of the screen, hit Ctrl, Shift, and the Overview key and then use the on-screen guides to select the area you want.
55. Need to focus? Open up Chrome OS's notification panel — at the bottom-right of the screen — and click the icon that looks like a circle with a line through it (above the word "Notifications"). That'll put your Chromebook into Do Not Disturb mode, and no notifications will alert you until you turn it off.
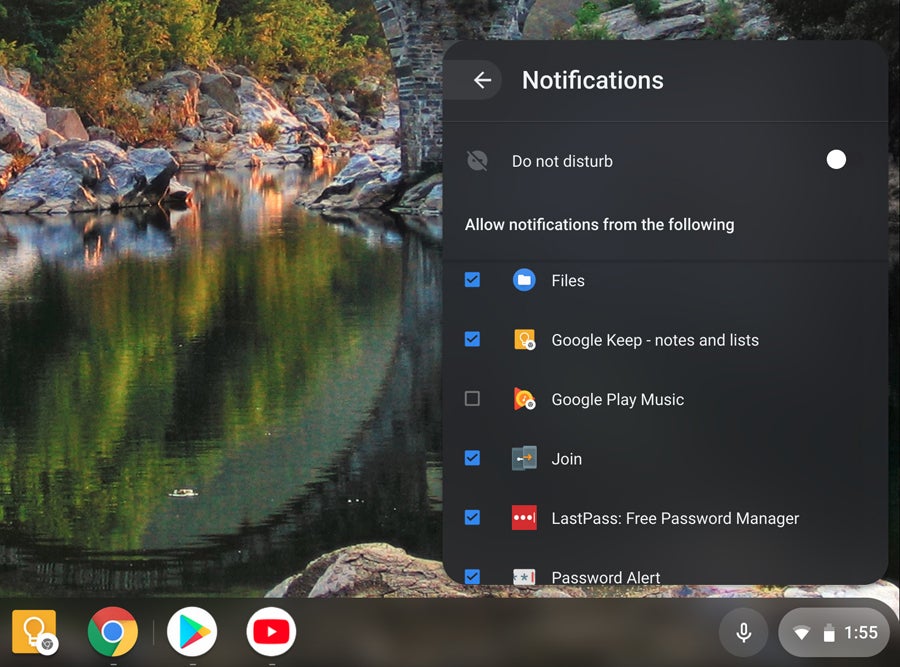
56. You can also limit which apps and processes are allowed to notify you in general. Just click the word "Notifications" in that same area of the notification panel and then uncheck any titles you don't want to be able to generate alerts.
 JR Raphael/IDG
Stop individual apps and processes from notifying you to cut down on distractions. (Click the image to enlarge it.)
57. Give your eyes a break from the glare and take advantage of Chrome OS's Night Light mode whenever you're staring at your screen in the dark. Night Light adjusts the temperature of your display to make it less harsh in dim conditions (just like the same-named feature on certain Android phones, such as Google's Pixel devices). You can activate it by looking for the Night Light button within the Quick Settings panel — and you can customize its appearance and even tell it to turn on and off automatically based on the time of day by looking in the "Displays" section of the Chrome OS settings.
58. Speaking of visual optimization, take a moment to explore Chrome OS's recently updated wallpaper tool, which allows you to pick a category of images — things like cityscapes, landscapes, and art — and then have the system automatically refresh your device's wallpaper with a new image every day. After all, a pleasant work environment is critical for productivity, right? Right-click (or long-press) on an open area of your desktop and select "Set wallpaper" to check out the options.
59. If your Chromebook is running slowly or an app is acting up, hold the Search key and then hit Esc to open Chrome OS's Task Manager. There, you can see memory and CPU use for every active process and manually end any item as needed.
60. Pressing Alt and then the brightness up or down keys (in your keyboard's function row) will let you manually adjust your keyboard's backlighting — assuming, of course, that your Chromebook has a backlit keyboard.
61. Stylus users, listen up: If your Chromebook came with a connected stylus, be sure to look for the stylus menu in the lower-right corner of the screen (alongside the settings and notification panels). It'll give you quick-tap options for changing your stylus's current function and taking full advantage of everything it can do.
Breaking down boundaries
62. Don't forget about Chrome Remote Desktop. It's a simple and effective way to access another computer (Windows, Mac, Chrome OS, or Linux) from your Chromebook without any costly or complicated software.
63. If you need to show your Chromebook's screen on a larger display, meanwhile — like a Chromecast-connected TV in your office, conference center, or abode — look for the "Cast" option in the Chrome OS Quick Settings panel. It'll automatically pull up any compatible Cast targets on the same Wi-Fi network, and with one more tap, your computer's screen will be mirrored.
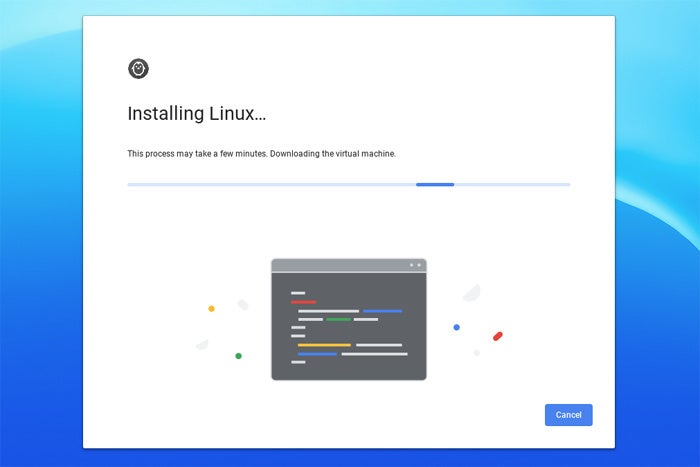
64. Remember that many recent Chromebooks can now run Linux apps — something that won't be sensible or necessary for most people but can be an interesting way for advanced users to expand Chrome OS's horizons. See my detailed Linux apps on Chrome OS guide to get started.
 JR Raphael/IDG
Setting up your Chromebook to run Linux apps isn't exactly simple, but for certain types of advanced users, it can open up a lot of intriguing possibilities.
65. Want to use a browser other than Chrome on your Chromebook for a while? That's actually now possible, thanks to the availability of Android apps on Chromebooks. Provided your Chromebook is recent enough to support the Google Play Store, just open it up and take your pick. You can install common favorites like Firefox and Opera along with more niche-oriented titles like Dolphin and Puffin. Heck, if you really want to get crazy, you can even install the Chrome Android app and run it on your Chromebook. Just be prepared to see the ghost of M.C. Escher cackling off in the distance.
This story was originally published in November 2017 and updated in December 2018.
Contributing Editor JR Raphael serves up tasty morsels about the human side of technology. Hungry for more? Join him on Twitter or sign up for his weekly newsletter to get fresh tips and insight in your inbox every Friday.
Source: https://www.computerworld.com/article/3237230/chromebook-tips-for-maximum-productivity.html
March 15, 2021
The 10 Best Text Editors for Your Chromebook
If you want to jot down notes or write code on your Chromebook, you're going to need a reliable text editor.
Here are some of the best HTML editors and text editors for your Chromebook device.
1. Caret

Caret is the Chromebook text editor of choice for developers and coders. The app runs completely offline and, importantly, is capable of opening and saving files either locally or in your Google Drive.
Modeled on Sublime Text, Caret is a full-featured, open-source code editor that uses Mozilla's Ace code editor to highlight code in almost any language you want.
Key features include tabbed editing, JSON-format settings files, and sublime-compatible keymappings. The only drawback for coders is the lack of Git and SFTP integration. Unfortunately, the developer has indicated he has no plans to incorporate support in the future.
For users who just want to use it as a simple note-taking and text-dump application, it works equally well. The interface is basic and clean, just like Notepad on Windows and TextEdit on macOS; it allows users to create simple documents and make quick edits to text files.
Download: Caret (Free)
2. Text

Text is a simple Notepad++ alternative for Chromebook. It doesn't have cloud-synchronization nor is it modeled on Sublime Text, but it does offer syntax highlighting for various programming languages and uses a distraction-free interface.
The app is powered by CodeMirror, though it doesn't take full advantage of the versatile text editor's features. For example, there is no integration of JavaScript autocomplete, yet smart indentation and bracket and tag matching are supported.
For those who do not have complex needs, Text offers a user-friendly experience that is easy to master. The app can save and open files directly to/from the local hard-drive, supports having multiple files open at the same time, and has full offline functionality.
Download: Text (Free)
3. Google Chrome

Unbeknown to many, a (very) simple text editor is built directly into the Chrome browser.
Enter data:text/html, <html contenteditable> in your Chrome's address bar and you'll be presented with an editable page just like Notepad and TextEdit. You can even save the document (as an HTML page) by hitting Ctrl + S.
It's worth bookmarking the link—although it's basic it will work 100 percent of the time, giving you a fail-safe option in an emergency.
4. Quick Write Text Editor

If you'd prefer a simpler way to use your browser as a text editor, the under-appreciated Quick Write Text Editor is worth a look.
The distraction-free app fills a tab with an editable field. You can set the text font, color, size, and change the color of the background.
Quick Write Text Editor also works offline—so when you want to edit text on your Chromebook while you're away from Wi-Fi, you won't be stuck.
Download: Quick Write Text Editor (Free)
5. Google Docs

Google Docs is primarily a Microsoft Word alternative for your Chromebook—but if you need a native app to quickly take notes on something, it will do the job.
The other Google app worth considering is Google Keep. It's great for project management, to-do lists, and saving documents on-the-fly. We've written how to use Google Keep if you'd like to learn more.
Download: Google Docs (Free)
6. Minimal Text Editor

If you want an even more minimalistic text editor for your Chromebook, try Minimal Text Editor.
There is a single box for you to input text. When you've finished, you can download the content to your machine with a single click.
A dark mode and a full-screen mode are both supported.
Download: Minimal Text Editor (Free)
7. Magic CSS

Magic CSS is a code editor for Chromebooks. It offers live previews of CSS/Less/Sass code changes.
It includes an auto-save feature, a CSS reloader, and syntax highlighting. You can also minify and lint your code, as well as loading the extension in iframes.
The app is open-source.
Download: Magic CSS (Free)
8. Web Text Editor

Web Text Editor is a nifty Chromebook app that will let you edit the text of any website in your browser.
Of course, you're not overwriting the content of the actual site, but it's useful for people who deal with text on websites every day and want to quickly point out potential changes to colleagues.
And let's be honest; the app also has great prank potential—just think of all those possible Wikipedia edits...
Download: Web Text Editor (Free)
9. Edit With Sublime Text

If you need an HTML editor for Chromebook, check out Edit With Sublime Text.
It allows users to edit the content of an HTML node element, as well as edit "TEXTAREA", "INPUT[type=search]" and "INPUT[type=text]" elements externally.
The extension can be used to edit multiple nodes at the same time, with each node having its own text file that you save as needed.
You can also use Edit With Sublime Text to access the DevTools panel and convert either an external script or an external CSS resource to an internal version.
Download: Edit With Sublime Text (Free)
10. Noteblock

We'll end the list with another very simplistic text editor, Noteblock.
It is designed to be used as a notepad to jot down ideas while you are browsing the web. When you click the extension, a text block will pop up in the top-right corner, and you can start writing immediately.
Uniquely for this type of app, Noteblock offers tabbed notes within the extension itself. That means not only can you keep your notes organized, but they also won't become lost among all your other tabs.
Your notes are saved locally rather than in the cloud, so you can rest easy from a privacy perspective.
Download: Noteblock (Free)
Start Doing More With Your Chromebook
Chromebooks might not garner the same number of headlines that they did a couple of years ago, but they are still great machines and fulfill most of your productivity needs.
With a bit of digging, you can also find free image editors, video editors, and audio editors.
The 10 Best Video Editors for Chromebooks
What's the best video editor for Chrome OS? Here are the best video editing software for your Chromebook!

Source: https://www.makeuseof.com/tag/four-best-text-editors-chromebook/
Dan joined MakeUseOf in 2014 and has been Partnerships Director since July 2020. Reach out to him for inquires about sponsored content, affiliate agreements, promotions, and any other forms of partnership. You can also find him roaming the show floor at CES in Las Vegas every year, say hi if you're going. Prior to his writing career, he was a Financial Consultant.
Subscribe to:
Posts (Atom)