December 28, 2015

Bandizip is probably the best free file archiver right now

By on in Software - Last Update: June 27, 2014 29
I have used different file archiving programs over the years on Windows including popular commercial programs such as WinRar or WinZip as well as a number of free applications such as Extract Now or 7-Zip.
While I really like 7-Zip, I started to notice that the application has its issues. The last stable version was released years ago and while the developer produces alpha versions of the program regularly, it is of no use to you if you do not want to run alpha software on your system.
Besides that it has its issues. 7-Zip does not support the new RAR5 format that was introduced back in 2013 and cannot open folders automatically after extraction.
I decided to look for an alternative that would tick all the boxes without sacrificing anything. Plus, the program had to be available freely as well as I had no intention of spending money for an archiver.
I reviewed Bandizip in 2011 for the first time and liked it a lot back then. The developing company has improved the application over the years so that it is now supporting all the features that I require from a file archiver. What those are? Glad you asked.
  1. Format compatibility - The program needs to support all major archive formats including zip, 7z, rar (including rar5), gz, ace, tar and others in terms of extraction, and major formats when it comes to archive creation.
  2. Convenience - Options to extract one or multiple archives from Windows Explorer and to open extracted folders after extraction.
  3. Other features - Unicode support is a must, as are options to customize the context menu and other program features.
Bandizip ticks all those boxes. The program supports 37 different file formats at the time of writing including all major archive file formats but also disc image formats such as ISO or IMG.


bandizip


The application is available as a portable version or setup for Windows as well as a (paid) version for Apple's Macintosh system. If you install the program on Windows, the file association settings page is opened right afterwards. Here you can associate archive file formats to open with the application.
Doing so will replace the icon of associated archives with the Bandizip icon. It also allows you to double-click the archive to run an action configured in Bandizip on it.


archive file formats association


One interesting feature of the application is the ability to change what happens when you double-click archives. The default action is to open Bandizip to display the contents of the archive.
You can change that however so that the archive gets extracted automatically for instance instead.
As far as customizations go, there are quite a few that make life easier for you. Here is a short list:
  • Configure what is displayed in the context menu and what is not.
  • Option to open the folder of an extracted archive after the operation completes.
  • Handling of long path names that exceed 260 characters.
  • Command line support.
When it comes to creating archives, Bandizip may not support a massive amount of options but the important ones are there.  It can create eight different archive types including zip and 7z, split up volumes, add password protection, self-extracting archives and change compression levels.

Closing Words

I have used 7-Zip for a long time but lack of updates and support for new file formats have forced me to find a replacement for the application. Bandizip ticks all the right boxes at the time of writing especially when it comes to extracting or browsing archives.

Source: http://www.ghacks.net/2014/06/24/bandizip-probably-best-free-file-archiver-right-now/

December 11, 2015

Meet Excel 2016: 9 of its best new features (PCWORLD)

Meet Excel 2016: 9 of its best new features, from databases to handwriting tools

The new database features alone justify upgrading, but that's just the beginning.


microsoft excel logo primary
Credit: Image: Rob Schultz

I’ve just started exploring Excel 2016. As one of the tentpole applications for the new Office 2016, it has a raft of new features for lucky upgraders. Take a closer look with me and see what you think.

1. Major database enhancements

The database enhancements alone—which include merging some of the previous Add-On programs such as Power Pivot and Power Query—more than justify the upgrade. You'll find options for Power Queries; Data Models; Reports; Pivot Tables; One-Click Forecasting; and some new, one-button workbook sharing through Power BI for creating and using interactive reports and dashboards.
excel-2016-power-query-options

2. Quick analysis tools

Quick analysis tools are a real timesaver, nudging you in the right direction with your data. After you've completed your spreadsheet or table, select the entire range. Note the lightning worksheet icon at the bottom right corner of the range: Click this icon, and a popup menu appears that displays a half-dozen options for what to do with this data.
excel-2016-quick-analysis-button
Note that each icon is a button/link to a submenu that provides more options (the selected icon turns dark green and bold).
excel-2016-quick-analysis-tool-submenu

3. New charts

Excel has six new charts to show off to your clients and colleagues. It’s still an easy process to create them, too: Just highlight the database table, select Insert > Recommended Charts, then choose one from the pictured samples.
Insert Recommended Charts
Or, if you’re not inclined to use one of the recommendations, click the All Charts tab, choose a category from the list, then select one of the designs from the pictured charts in that category.
We'll delve deeper into the new charts in an upcoming column, but here are two to whet your appetite:
Pareto sorts the bars by highest first and shows which bars have the biggest impact or highest return. Use this chart data to decide where to assign your resources.
Insert new chart Pareto
Waterfall (aka ‘flying brick’ chart) provides a visual method for viewing a series of positive and negative data, such as monthly cash flows. Because the bars seem to hover between the start and end columns, it looks sort of like a waterfall, hence the name.
Insert new chart Waterfall

4. New templates

Excel’s new templates come with sample data and charts, plus hands-on exercises that teach you how to use each template.
New template Cashflow—click Let’s Get Started button
08 New template Cashflow—click the Let’s Get Started button.
For example, in the My Cashflow template, Excel encourages you to try the Excel Data Model to manage your cash flow. Click the Let’s Get Started button, and Excel displays the My Cashflow charts. Click the buttons 2013, 2014, or 2015 to see the chart data change by year.
New template CashFlow chart
09 New template CashFlow chart
If you click the Go button, you can add some new data to the Sample Data spreadsheet, then watch the charts change based on your new input. Once you get the hang of it, just replace Excel’s sample data with some real data of your own and Excel does the rest. Other new templates include Stock Analysis and My Calendar.

5. 3D / Power Maps

These mapping tools were an add-in program in previous versions, but they're now included in 2016. You can compare data such as temperatures, or rainfall, or populations of a given area over a specified time, rendered in three-dimensional images.
3D Maps/Power Maps
You can map data (plot millions of rows of information visually on Bing maps), discover how data changes over time and space, and create and share stories (called Video Tours) about the information you’ve collected. Stay tuned for a complete review on this excellent new feature in Excel 2016.

6. Easier collaboration and sharing

Real-time collaboration is finally here. Share ideas, data, queries, reports; and co-author worksheets, charts, graphs, Pivot Tables, databases, and more.
Click the Share button in the top right corner. When the Share panel opens, click the Save to Cloud button. The Backstage menu opens and displays the Save As screen. Choose the option that fits your situation—OneDrive, SharePoint, or another online location. Select the appropriate folder and click the Save button.
Once saved, the document reappears with the Share panel open. In the Invite People field, click the open book icon and select colleagues from your address book in Outlook. Set permissions and notifications, then click the Share button to send the document links to your designated colleagues.
Real-time collaboration and sharing

7. Smart Lookup

This feature (available in most of the Office 2016 programs) is like having the Internet on speed dial. Also called “Insights” from Bing, the information hails from various resources such as Wikipedia, the Oxford dictionary, Bing image search, and Bing Snapshot.
Just place your cursor on any word or highlight any phrase on your spreadsheet and right-click. Select Smart Lookup from the dropdown list. The “Insights” panel opens on the right and displays information and images about the subject you highlighted.
Smart Lookup features Bing Insights

8. Tell Me

Located on the right side of the Ribbon menu after the last tab, this feature provides a search box with a light bulb that says “Tell me what you want to do.” It’s like your personal valet: Ask it a question, command it to do something, or select one of the Recently Used queries, and it obeys.
Tell Me how to sort and filter data
Just click the Tell Me box and type your question. A list box drops down with your current request on top; followed by alternate choices (if there are any); followed by the most Recently Used queries; followed by an option to select and use the official Help menus; followed by the Smart Lookup feature, which adds the knowledge of the Internet to help you find the right answer.
Tell Me—show me what to do next

9. Ink Equations

This new feature converts your handwritten equations (or mathematical problems) to text, so you can insert them into your documents. You can use whatever tool works best for you—the mouse, a digital or light pen, or even your fingers—to write the math equations/problems.
Ink Equations submenu
Just select Insert > Symbols > Equation, then click Ink Equation from the drop-down menu. A Preview chalkboard box appears with writing tools displayed along the bottom.
Handwrite a math problem or an equation
That’s all for the big stuff, and Excel has a lot more surprises for its fans. Stay tuned for deeper dives into more of the great features in Excel 2016.


Source: http://www.pcworld.com/article/3010614/software-productivity/meet-excel-2016-9-of-its-best-new-features-from-databases-to-handwriting-tools.html#tk.rss_howto


JD Sartain journalist

JD Sartain is a technology journalist from Boston. She writes a monthly "Case Studies" column for CIO, a weekly "Max Productivity" column for PCWorld, and she's been a regular freelance writer at Network World for nine years.
More by

December 1, 2015

How to Set a Task Reminder in Outlook 2013

You may want to set a reminder in Outlook 2013 to help you stay on top of your task assignments. Reminders pop up at the time you specify to let you know it’s time to pay attention to a task. You can also enter your own custom reminder text.
Set your reminder to occur before the task’s actual due date to give yourself some time to work on it. For example, set a budget’s reminder for two weeks prior to the date.
  1. In the Tasks area of Outlook, double-click a task you have created.
    It opens in its own window.
  2. Select the Reminder check box under the due date.
  3. Today’s date may already appear in the Date box. If it doesn’t, open the Date drop-down list and select today’s date.
  4. Open the Time drop-down list and select a time that is 3 minutes from now. If the exact time isn’t one of the choices, close the drop-down list, click in the Time box, and manually type the time.
    See the figure.
    A default-assigned sound plays when the reminder occurs. To change the sound, you can click the Sound button (it looks like a speaker) and browse for a different sound file.
    image0.jpg
  5. Click the Save & Close button.
  6. Wait 3 minutes for the reminder box to pop up.
    See the figure.
    image1.jpg
  7. Click the Dismiss button.
    The reminder is dismissed.
    You could have clicked Snooze instead to make it disappear temporarily but pop up again later.


November 19, 2015

12 Tips to Take Better Notes with Microsoft OneNote


Can the way you take notes change your life? I think so. Microsoft think’s so, too.
And young Kyle Madinger proves this for Microsoft’s note taking tool with his success story from Canada. In OneNote Hero: A Student Success Story, he is the hero who goes from struggling homeschooler to classroom success. Every Frodo needs a Sam. Any hero needs a dependable companion. In his case, Microsoft OneNote gave him the space to develop his motor skills.
Okay, there might be a bit of marketing storytelling hidden between the frames, but let’s not deny digital notetaking skills its due. Our school system taught us a linear way of note-taking which was neither effective nor digital. If you are still buried in books, an earlier look at OneNote skills for students and teachers still holds true. For those out of school, note-taking is still tailing us through meeting rooms and shopping aisles.
It’s time to take better notes. If you want to do it with Microsoft OneNote, follow me down the lane of note-taking productivity with these 12 tips.


1. Quick Notes — The Center Piece for Better Notetaking

Microsoft OneNote - QuickNote
Ever searched for a scrap of paper to jot down something without thinking too much about it? Quick Notes (formerly called Side Notes) is that digital “scrap of paper”. But unlike those scraps of paper, you won’t lose them because Microsoft OneNote saves them automatically.
There are two ways to start Quick Notes.
Note: Quick Notes appear with a simplified interface and a customizable lavender background. Click the row of buttons on top if you want to access the Ribbon. Sometimes, I like to open the Ribbon and just tag the note before I fire and forget it.

When the OneNote Window Is Not Open

Press Windows + N on your keyboard. The little new Quick  Note window appears like an always on top pop-up. Type your note in the small note window.
Microsoft OneNote - Shortcut Key
Format the text by selecting it and then using the commands on the mini toolbar that appears.
Repeat the steps for any additional Quick Notes you want to create. (Alternatively, use shortcut key Windows + Alt + N on your keyboard). Quick Notes are automatically saved to your notebook’s Quick Notes section.
Microsoft OneNote - All Filed

When The OneNote Window Is Open

You can still use the shortcut key. Or go to the Ribbon > View > New Quick Note.
Microsoft OneNote - New Quick Note
Type your note in the small note window. Click the three little dots to display the Ribbon. Format the text by using the commands that appear.
Repeat the steps for any additional Quick Notes that you want to create.
The best thing about Quick Notes is that you can fire them out and forget them. All quick notes are saved automatically in the Unfiled Notes section in your default notebook. Go there later and organize them if you so wish.
With that explained, now let’s exploit Microsoft OneNote’s Quick Notes feature for all our note-taking needs.


2. Pin Quick Notes to the Desktop

Pinning Quick Notes to the desktop helps you keep the little notes window on top and insert notes from any tool you are working with. For instance, an open browser window.
To pin the Quick Note window, click the three little dots to display the Ribbon. Go to View > Always on Top. Think of it as a “sticky note”.
Microsoft OneNote - Quick Note on Top
Drag and drop any selected content. OneNote saves it automatically with the source link.
Some useful Microsoft OneNote shortcuts you can use for quick notes include:
  • CTRL+1 for creating quick to-do lists,
  • ALT+SHIFT+F (for inserting the current date and time),
  • CTRL+PERIOD for a quick bulleted list,
  • CTRL+SLASH for a numbered list, or
  • ALT+SHIFT+RIGHT ARROW (or use the TAB) to create indents and outline your thoughts.


3. Access Your OneNote Pages with Shortcuts

Any note you create in Microsoft OneNote can be directly given a shortcut. Create a few note shortcuts on the desktop and try them to see if they speed up your note-taking workflow.
In OneNote, right click on the page tab, or section tab that you want the shortcut to go to. Choose Copy Link to Notebook, Copy Link to Section, or Copy Link to Page.
Microsoft OneNote - Create Desktop Shortcut
Go to your desktop. Right click on the desktop. Choose New > Shortcut. In the location box, press Ctrl-V to paste the OneNote hyperlink.
Microsoft OneNote - Desktop Shortcut
Click Next. Give the shortcut any name to indicate its function. Click Finish.
You can speed this up even further by giving the shortcut its own keyboard shortcut. Right click on the shortcut icon and choose Properties. Select the Shortcut Key box and press the key combination you want for the shortcut.


4. Take Linked Notes

OneNote really comes to the party when you have to work with other Microsoft Office apps. Two features help you use the apps side by side.
Dock to Desktop. Work on any other open window by docking OneNote to the side of the screen. Use the shortcut CTRL+ALT+D or go to Ribbon > View > New Docked Window.
In the screenshot below, you will notice that I have created a button for it on the Quick Access Toolbar.
Microsoft OneNote - Dock to Desktop
Usefulness of Linked Notes. By linking OneNote to Internet Explorer, Word, PowerPoint, and even other OneNote pages, you can take notes in OneNote while simultaneously using the other program. Both files are automatically linked to whatever you’re researching. This saves you a lot of copy and paste. Also, you can always refer back to either the note or the main document by clicking on the link.
For instance: In the collaborative Microsoft Office 2016, you can keep track of discussion and ideas about a document or presentation with Linked Notes.
Open Word, PowerPoint or OneNote, click Review > Linked Notes.
Microsoft OneNote - Linked Notes
In the Select Location dialog box, pick a location for the new notes page and click OK.
Microsoft OneNote LinkedNote
When you select a section, a new page is created in it. If you select an existing page, your linked notes will be added to that page. Move the cursor to where you want the notes to begin. OneNote stores a thumbnail image of the page, a text excerpt, and a link to the documents or web page you used for research. Clicking here you can always return to the source content.
Click on Stop Taking Linked Notes when you want to end this association.
We have seen how Linked Notes work in Microsoft Word 2010 and OneNote 2010. The same process continues in Microsoft Office 2016.


5. Take Quick Notes with Only Your Voice

Voice memos have existed since the first Dictaphone. With Siri and Google Now around, no one thinks we are abnormal anymore.
OneNote is free on all platforms. You can take notes (and voice notes) with the Windows Desktop application and the apps on Windows Phone, Apple iPad, iPhone and Android. On the desktop app, you can take synced audio notes which are really great for meetings.
Mix and match normal notes and audio notes. OneNote makes it more useful by recording to the specific time of the audio note. When you are reviewing your notes, you can quickly jump to the position of the recording when you took the note.
Microsoft OneNote - Audio Notes
You can use the search bar to search for words in the recorded audio as well. Your search mileage may differ depending on the quality of the recording.
To turn on Audio Search:
Click File > Options > Audio & Video. Under Audio Search, select Enable searching audio and video recordings for words and click OK.
Search Audio in OneNote
With the help of mobile apps, you can just tell OneNote your thoughts and it will file it away as a Quick Note. Your note-taking experience is enhanced with Cortana on Windows 10, Windows Phones, Siri on iPhones, and Google Now on Androids.
The Windows Support article shows how to create quick notes in OneNote using only your voice.


6. Email Notes to Yourself

The video above shows a quick use self-notes with a me@onenote.com email address. You can use the same email address to send any content from a specific inbox to OneNote. This feature has been introduced in Microsoft OneNote 2016 and here’s how you can set it up in the blink of an eye from the OneNote Email Settings page.
Email Notes to Yourself
The Microsoft Blog says this is a great way to forward receipts, travel itineraries, or documents that you want to keep track of from your mailbox. As OneNote is synced, your notes will appear on all platforms where you use it.


7. Send to OneNote from Chrome

Microsoft OneNote integrates nicely with Internet Explorer. But who uses that anymore? People use Chrome…so say a hello to the OneNote Clipper. Capture anything on a webpage with the extension and send it to a specific location in OneNote. The extension also cleans the clutter in articles.
Send to OneNote from Chrome
The new version of the Clipper has a redesigned user interface, a location picker, and region clipping for Chrome.


8. Take Notes from the Edge

The Clipper is for all that you do on Chrome.  With Windows 10, we have Microsoft Edge to play with. The new browser has a pen and a highlighter to help you annotate and take notes as you browse. You can then store the annotated pages in OneNote, Favorites, or Reading List in Microsoft Edge.
Taking notes with Edge


9. Take Screen Clips and Annotate

The Screen Clipper is a quick way to capture visual information with OneNote. Take a screen clipping of any part of your computer screen and add it as a picture in your notes.
To access the screen clipper, go to Ribbon > Insert > Screen Clipping. The screen is dimmed and you can use your mouse or finger to select the area of the capture.
OneNote Screen Clipping
And more:
  • With the OneNote system tray Quick Note icon, you can also create a screen clipping, without opening the main OneNote window.Screen Clipping from the Tray Icon
  • Use the Draw tools to annotate your screen clips.


10. Taking Notes with the Natural Ease of a Stylus

Writing notes with a stylus brings it close to the old-fashioned way of taking notes…with a few extra benefits. OneNote for Windows has a full Ribbon for inking since 2003. The Draw group on the Ribbon gives you pens, thickness options, and colors to choose from. Even without a stylus, you can draw, highlight, and edit with your finger or mouse on any touch-capable device.
OneNote for iPad has been updated with a similar feature set — four classic pens in the Draw tab and 16 colors to write or draw, and four colors to highlight with. Activate Palm Rejection on the Ribbon and set it for the way you hold the pen.
Perhaps the best experience comes from the killer combination of OneNote, Surface Pro 3 (or Surface 3), and the new Surface Pen.
And remember: OneNote also comes with OCR and handwriting recognition that works in 25 languages!


11. The Quickest Way — Office Lens

What can be quicker than snapping a photo of a whiteboard or a scribbled sheet? Office Lens is OneNote’s own scanner for taking those quick snapshots when you are too lazy to take notes yourself. Anything scannable is fodder for Office Lens. Office Lens has three modes to clean up your captures.
Office Lens
Combine the utility of Office Lens with OneNote’s OCR functions to organize the information from your scans neatly into your notes. Office Lens is available for Windows Phone, Android, and iOS.


12. OneNote and Outlook Work Together

For a professional user, notetaking and the inbox are like Siamese twins. One cannot do without the other. If Evernote pays attention to Gmail, Microsoft OneNote has to also include Microsoft Outlook in the mix. A basic way is to send your emails to your OneNote notes.
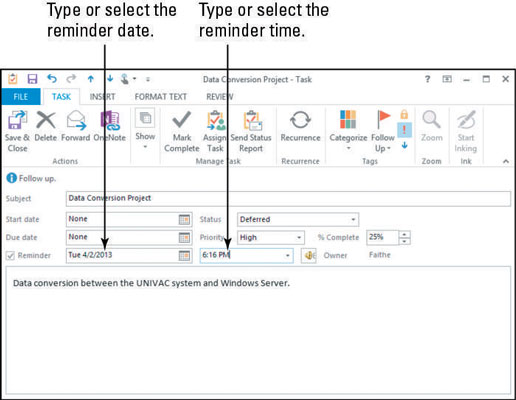
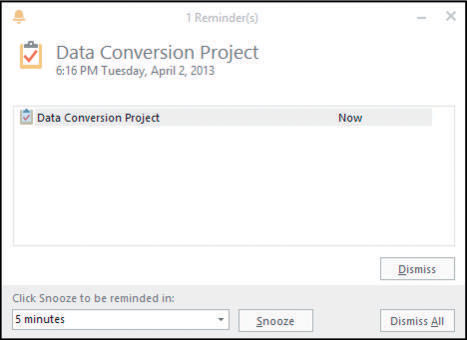
Even better, you can use Outlook tasks and reminders for any to-do in the future. The tasks are displayed in Outlook so you can track and view them — and also set reminders. Correspondingly, Outlook tasks are linked to the OneNote page.
Taking Notes from Outlook
Ryan showed you how to easily combine Outlook and OneNote into a powerful project management tool. You can even manage meeting details and send pages of notes via an Outlook mail. This Microsoft Support page walks you through the process.

Which Are the Note Taking Features You Are Using (Or Not Using)?

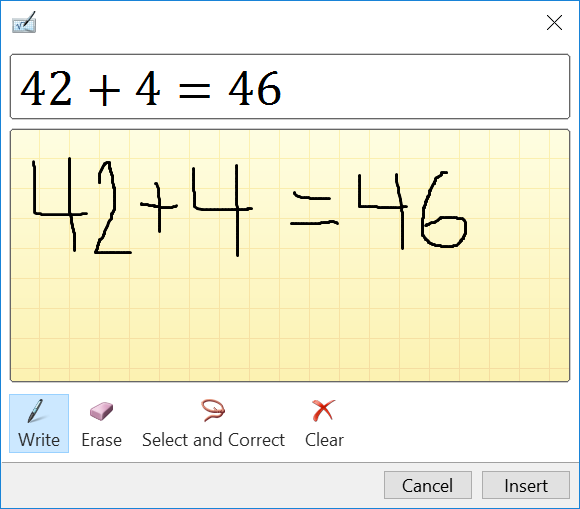
Maybe you like the fact that you can embed almost anything into OneNote. Maybe, it’s the deft with napkin math that makes you love the software. Or maybe, unlike Evernote, you can customize the background of the “paper” you are writing on. Microsoft OneNote gives you many reasons to like it, and only few to hate it.
We would like to know!
What are your best note taking tips for wannabe OneNote users? Which is the one feature that is still missing? Or do you still Evernote all the more? Tell us.


Source: http://www.makeuseof.com/tag/12-tips-take-better-notes-microsoft-onenote/

November 9, 2015

Editing PDF files using Word 2013

Editing PDF files

A PDF file is a type of file that is designed to be viewable on any computer. It is useful when you want to send a document to someone and you're not sure whether that person has Microsoft Word. PDF files are designed for viewing rather than editing, so they are ideal for situations where you have a final version that does not need any changes. However, if you need to edit a PDF file for any reason, Word 2013 allows you to edit it by converting it into a Word document.
Converting a PDF file into a Word document may cause some graphics and content to look different or disappear altogether.

To edit a PDF file:

  1. Select the File tab.
    Screenshot of Word 2013
  2. Backstage view will appear. Click Open.
    Screenshot of Word 2013
  3. Locate and open the PDF file you want to edit.


    Screenshot of Word 2013
  4. A dialog box will appear confirming whether you want to convert the PDF file into a Word document. Click OK.


    Screenshot of Word 2013
  5.  If the PDF file has content that Word is unable to convert, another dialog box may appear. Click OK.
  6. The PDF file will appear in the Word window as an editable document. You can now make any changes you want.

  7. Screenshot of Word 2013
  8. When you're ready to save, locate and select the Save command on the Quick Access toolbar.
    Screenshot of Word 2013

  9. The Save As dialog box will appear. Select the location where you want to save the document. If you want, enter a new file name.
  10. Click the Save as type: drop-down box, then select a file type. You can choose to save the document as a Word Document or as a PDF file.
  11. Click Save.


    Screenshot of Word 2013

Which file type should you choose?

After you finish converting and editing your PDF file, you'll need to decide whether to save it as a PDF file or a Word document. Depending on your situation, one option may work better than the other:
  • PDF: If you don't want to make any more changes to the document—or if you want to ensure that the file can be opened on any computer—save it as a PDF file.
  • Word document: If you want to continue making changes to the document—or if other people need to edit it—save it as a Word document. You can always save it as a PDF file when you're done making changes.

    Source: http://www.gcflearnfree.org/word2013/word-2013-editing-pdf-files