One of the best
ways to get started with cloud computing is to use a cloud-based e-mail
service such as Google's Gmail instead of server-based Microsoft
Exchange. However, you may not be ready to jettison the familiar
interface of Microsoft Outlook just yet. Not to worry: Outlook can be
configured to work with Gmail.
![[Credit: ©iStockphoto.com/Devonyu]](http://media.wiley.com/Lux/19/472319.image0.jpg)
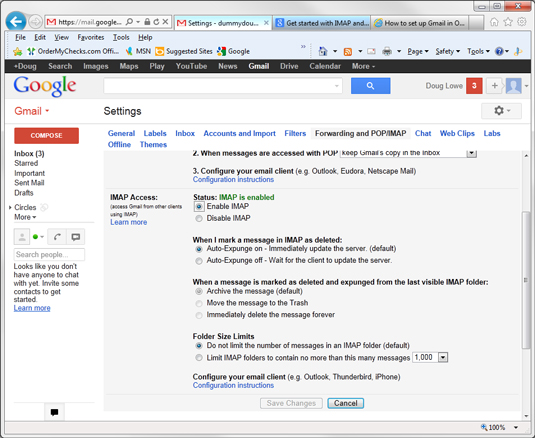
But before you can configure Outlook to work with Gmail, you must configure Gmail to work with Outlook. To do that, you must enable the IMAP protocol for your Gmail account. Here are the steps:
Credit: ©iStockphoto.com/Devonyu
But before you can configure Outlook to work with Gmail, you must configure Gmail to work with Outlook. To do that, you must enable the IMAP protocol for your Gmail account. Here are the steps:
- Log into your Gmail account.
- Click the gear icon at the top right, then choose Settings.
- Click Forwarding and POP/IMAP to bring up the POP and IMAP settings.
- Click Enable IMAP.
- Click Save Changes.
- Start Outlook 2013.
- Choose File→Account Settings.
- In the Account Settings dialog box, click New.
- Choose Email Account, then click Next.
- Choose Manual Setup or Additional Server Types, then click Next.
- Choose Pop or IMAP, then click Next.
- In the Add Account page, enter the following information:
Your name: The display name you'd like to use Email address: Your complete Gmail address (e.g., me@Gmail.com) Account type: IMAP Incoming mail server: imap.Gmail.com Outgoing mail server (SMTP): smtp.Gmail.com User name: Your complete Gmail address (e.g., me@Gmail.com) Password: Your Gmail password 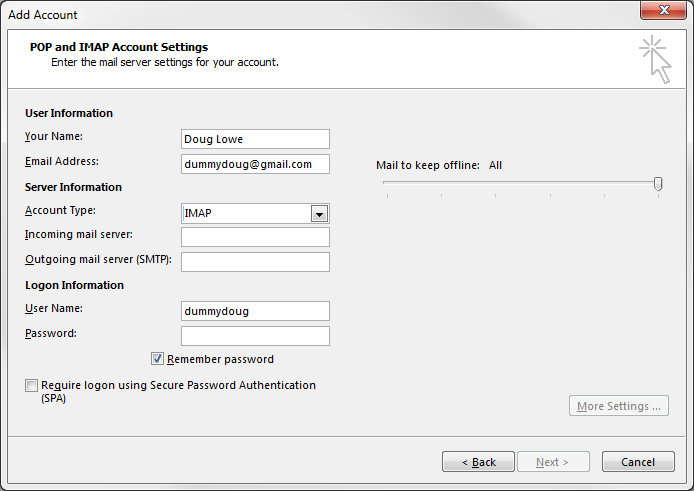
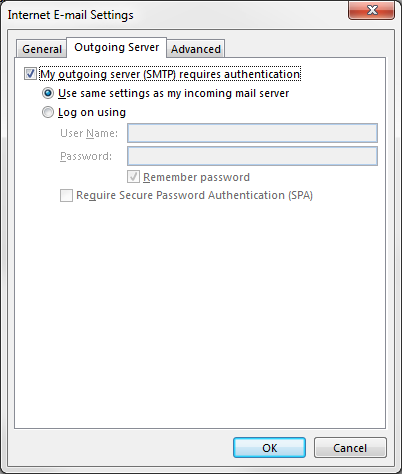
- Click More Settings.
- Click the Outgoing Server tab.
- Select My Outgoing Server (SMTP) requires authentication.
- Select Use Same Settings As My Incoming Mail Server.
- Click the Advanced tab.
- Enter the following information:
Incoming server (IMAP): 993 Use the following type of encrypted connection: SSL Outgoing server (SMTP): 465 Use the following type of encrypted connection: SSL 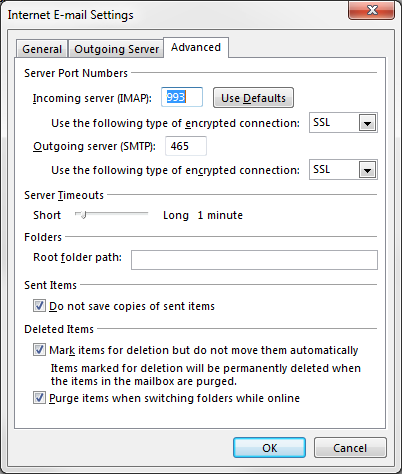
- Click OK to close the More Settings dialog box.
- Click Next.
- Be patient while Outlook tests the connection.
- When the test completes, click Close. (If the test is not successful, carefully double-check all of your entries.)
- Click Finish.