Again, it does not need to be so technical always. With a dash of imagination, you can simplify both your work or life with flowcharts. One of the easiest tools on hand for making quick flowcharts is Microsoft Word.
Here are the different ways to create flowcharts in Word.
What Are Flowcharts?
Frank Gilbreth, an engineer is believed to have created the first “Process Flow Charts” in 1921.
A flowchart is an easy to understand diagram of any process that uses simple graphics to represent a beginning, an end, and the different stages that follow a logical order. Each step in the process is represented by a unique symbol with a brief label of the process step. The flowchart symbols are linked together with arrows showing the direction of the process flow.
As you can see from the diagram below, each symbol is standardized for a specific process.

As standard symbols illustrate the steps, it is easy to make out how it all fits together. Flowcharts can be customized for any process-oriented tasks. That is why a large variety of flowcharts are visible—but the basics remain the same.
Uses of Flowcharts
The beauty of flowcharts lies in their simplicity. You can use basic symbols to map out any job and you can use flowcharts for different situations. Out there on the Web, there are nice usable ones for using copyrighted pictures. All thanks to the ease of creating flowcharts either by hand or easy to use diagramming tools.
Once the flowchart has been illustrated, it is easy to take a birds-eye view and understand the whole process. Just the process of drawing the flowchart can help to clear your own logic and give you insights to make it better.
To sum up:
- Examine any process.
- Communicate steps to other people involved in a process.
- Organize a process by removing redundant steps.
- Identify and troubleshoot potential problems.
- Improve a process.
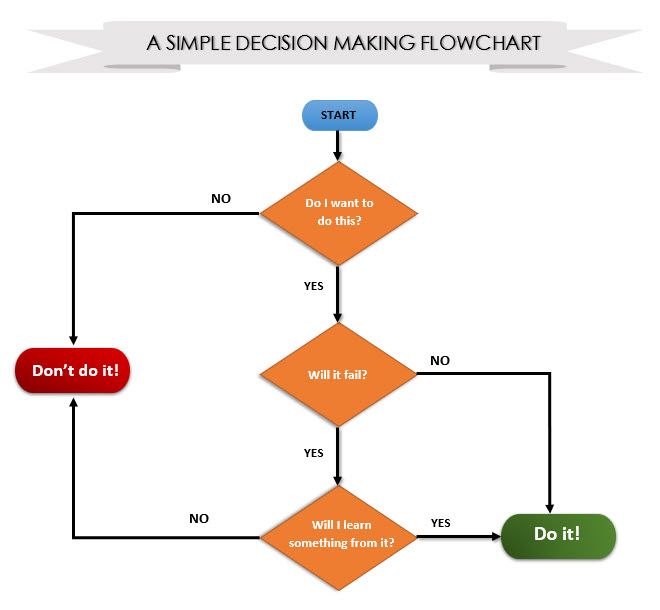
A Basic Flowchart
Flowcharts come in different shapes and sizes. Here is an example of a basic flowchart which you can use to make simple decisions.

How to Make a Flowchart in Microsoft Word
All the tools needed to make flowcharts in Microsoft Word 2013, 2016, or 2016 lie within the Drawing Tools. But first do these three preliminary steps:
Maximize your page area. Collapse the Ribbon by clicking the little upward arrow (or click Ctrl + F1) on the extreme right so only the tab names show.
Display the Grid. Click the View tab and click the Gridlines checkbox. The grid helps you align and size the flowchart symbols precisely as you can snap them to the gridlines.
You can also customize the gridlines: Page Layout > Arrange > Align > Grid Settings.

Use the Drawing Canvas. Inserting any shape or “drawing” in a Word document automatically creates a drawing canvas. You will have to resize the canvas to frame your entire flowchart.
As this Microsoft support page says, it is especially useful when using different shapes (as in a flowchart). Also, you can customize the drawing canvas itself to create attractive backdrops for your flowchart.

Now, let’s start the meticulous job of inserting our shapes and connecting them all together. It always helps if you map it out on paper first, and then use Microsoft Word to give it the finished look. A rough sketch helps you understand the page layout on Word. The process is simple but putting some planning into using this “planning tool” is a timesaver.

All the required symbols can be found on the Insert tab > Shapes. Click the dropdown for Shapes.
- The symbols are neatly organized under the Flowchart group.
- Select the shape. For instance, any shape that looks like an oval can represent “Start”.
- Click in the canvas area, keep the left button pressed while dragging the mouse to add the shape. You can also double-click on any shape to automatically add it to the Canvas. Move and resize it.

- Add text by clicking the shape and typing in the label with a text box.
- Connect two symbol-shapes with the help of arrows or connectors. Unlike simple arrows, connectors stay connected to the shapes. The two basic types of connectors available under the Shapes dropdown are elbow and curved.

Note: Connectors work as intended only between shapes placed on the drawing canvas.

For instance, you can manually move the connectors to any connection points (represented by tiny blue dots on the shapes). The connection points anchor the connectors in place and you can move the shapes without dislodging the connectors. This gives you a lot of flexibility when modifying your flowchart by moving things around.
- Add a Yes or No to the connectors branching out of Decisions shapes by inserting Text Boxes alongside the connector arrows. You can also use the rotation handle to rotate the text box.
Tips to Align Shapes
There are several ways to do it.
- The recommended way is to do it right the first time. Use the gridlines and draw them with uniform widths when you are placing them on the canvas.
- Click on individual shapes and drag them to the new locations. If you have many shapes, this can be very time consuming. The gridlines help you snap them in place.
- Select all the shapes you want to align. On the Format tab, click the Align dropdown menu. Select Align Selected Objects and use the alignment tool to align the shapes automatically.
Tips to Align a Flowchart
After the flowchart has been laid out, you can neatly align the diagram according to the page.
- Group all the shapes and connectors. Select all the shapes and connectors. On the Format tab, click the Group dropdown and select Group.
- From the Align dropdown check if the Align to Margin item is selected. Then, click Align Center and/or Align Middle.
- Optionally, resize the canvas by dragging the corner or edges.
Create a “Stunning” Flowchart in Word
The colorful flowchart you see above is nothing but a more formatted flowchart. Formatting a flowchart in Word should be the final stage after you have inserted, connected, and labeled all the boxes. It is better to do it in bulk rather than putting the flourishes on individual boxes as you go along. So, select multiple shapes and format them together.
I will leave it to your creative eye, and just point you to the basic tools you can access from the Format tab on the Ribbon or the more detailed options available on the side panel.
Open the side panel by right-clicking on a shape and selecting Format Shape.

You have many options available to design the shapes and the connectors:
- Shape Styles: A quick way to add color or gradient fills to the shapes.
- Shape Fills: Use your choice of solid colors or gradients. Don’t use too many color schemes.
- Shape Outlines: Set the visual properties of the bounding lines. Also, use it to make the connector arrows thicker or thinner.
- Effects: Give the shapes depth with three dimensions, shadows, etc.
As you can see, there are many options to add a variety of finishing touches to the bare-bones flowchart. It is painstaking, but do fuss over it if you want a thoroughly professional look.
You could also start with a flowchart template and customize it to your needs.
The Best Flowchart Templates for Microsoft OfficeFlowcharts visualize processes. We have compiled the best flowchart templates for Microsoft Office, including Word, Excel, and PowerPoint.READ MOREMake Your First Flowchart in Word
From the humble pen and paper to specialized applications like SmartDraw and Microsoft’s own Visio, there are many ways you can create flowcharts. You also have the option of using the LucidChart add-in from within Microsoft Word 2013, 2016, or 2019. It is available on the Microsoft Office store and is free to install but additional purchases may apply.
We spend an incredible amount of time using the Microsoft Office suite. So, it does make sense to be aware of all its powers. From basic image editing in Word to brainstorming with mindmaps, it is the Jack of many a trade.
And in case Microsoft Word doesn’t cut it for you, these Windows flowcharts tools are a download away.
Source: https://www.makeuseof.com/tag/create-stunning-flowcharts-microsoft-word/
Source: https://www.makeuseof.com/tag/create-stunning-flowcharts-microsoft-word/